Table of Contents
To increase modulus in thin-wall injection molding parts without brittle failures, you must balance material selection, processing, and design; toughness is preserved while stiffness is increased by optimizing resin choice, filler type and loading, melt and mold temperatures, gate placement, shear profiles, and controlled cooling. This article provides guidance on how to reliably push modulus in high-performance thin-wall components by choosing additives, orientation control, annealing, and testing techniques.
Innovative Gate Design for Efficient Filling
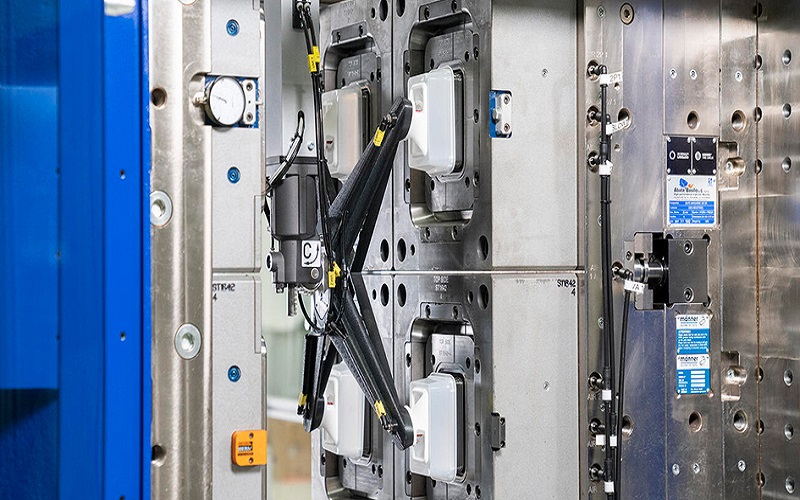
Innovative gate designs—valve, fan, edge, and submarine tips—let you shape the melt front and reduce shear in 0.4–0.8 mm walls, enabling fill times under 0.2 s at melt-front velocities of 2–5 m/s. You can reduce flow-length-to-thickness ratios below 200 by pairing multi-gate layouts with hot-runner manifolds, which lowers injection pressure needs and minimizes weld lines while preserving part stiffness.
- Optimizing Flow with Strategic Gate Placement
Thin-wall injection molding place gates to shorten the longest flow paths and balance pressure: for a 200×120 mm thin panel, three symmetrically spaced edge gates cut maximum flow length from 200 mm to ~70 mm, halving the required injection pressure. You should use Moldflow or Moldex3D to iterate gate size and angle; 0.6–1.0 mm gate diameters commonly suit amorphous resins, while semi-crystalline polymers often demand slightly larger openings.
- Fast-Filling Solutions for Thin Wall Structures
Adopt fast-filling hardware—hot-runner valve gates and high-speed presses—to achieve fill times below 0.2–0.3 s for 0.5–0.8 mm walls. You can specify valve-tip diameters of 0.6–1.2 mm and injection speeds >150 mm/s to avoid hesitation and cold slugs; pair with short, high-pressure packing (400–900 bar) to lock in modulus without inducing brittle failures.
In one case a consumer-electronics OEM switched to a valve-gated hot-runner with 0.8 mm tips and a tie-bar-less high-speed press, trimming cycle time from 12 s to 8 s and reducing scrap by ~40% while holding a 0.6 mm wall and target modulus. You can replicate gains by tuning gate timing—open main gates for ~0.12–0.18 s, then apply a 0.5–1.0 s pack—validated via short-run trials and in-mold pressure sensors.
Preserving Toughness through Shear and Temperature Control
Balance shear and thermal history to push modulus without brittleness: limit shear-rate spikes (shear >1×10^4 s⁻¹ promotes chain alignment), keep melt temperatures in the polymer’s recommended processing window to avoid degradation, and use larger gates or stepped packing to reduce localized shear. Install cavity pressure and melt-temperature probes to correlate events with failures and iterate screw speed, back pressure, and gate geometry until you see consistent energy absorption in drop-weight tests.
Shear & Temperature Controls
| Key Parameter | Practical Action |
| Shear rate | Reduce screw rpm, increase gate area, or lengthen flow path to keep peak shear <1×10^4 s⁻¹ in thin sections |
| Melt temperature | Stay within supplier window; raise Tmelt to lower viscosity but avoid >20–30°C above recommended max to prevent chain scission |
| Mold temperature | Optimize mold temp to control skin formation and weld strength (use variothermal when needed) |
| Process monitoring | Use pressure and thermocouple sensors to link spikes to structural defects |
- Analyzing Shear Profiles to Enhance Material Performance
You map shear using rheometer data, injection-scanner/pressure sensors and CAE flow simulations to find hotspots where orientation rises; CFD often shows shear peaking at gates and thin ribs—reducing gate shear by 30–50% (larger gate, lower thin-wall injection molding speed) typically restores isotropy and improves Izod impact by measurable margins. Correlate in-mold sensor traces with post-mold mechanical tests to validate changes.
Shear Analysis Tools
| Tool | Use |
| CAE/CFD | Predict shear-rate distribution and identify gate or rib hotspots |
| In-mold pressure sensors | Detect shear-related pressure spikes in real time |
| Rheometry | Provide viscosity vs. shear-rate curves for accurate simulation inputs |
| Trial metrics | Compare impact strength and elongation after targeted shear reductions |
- Temperature Management Techniques for Optimal Toughness
To regulate crystallinity, residual stress, and weldline strength, you regulate the melt and mold temperatures: To increase surface fusion and toughness without over-processing, adjust the mold temperature (amorphous typically 40–80°C; semicrystalline 60–120°C), set the melt temperature within the supplier’s specifications (typical ranges: amorphous 220–280°C, semicrystalline 200–260°C depending on resin), and use staged cooling or variothermal molds.
Temperature Strategies
| Parameter | Recommended Action |
| Melt temperature | Optimize for flow—raise to reduce viscosity but avoid thermal degradation and color change |
| Mold temperature | Increase to delay skin freeze for better welds; use variothermal for fine features |
| Cooling profile | Use conformal cooling or segmented cooling to minimize thermal gradients and residual stress |
| Monitoring | Track cavity thermocouples and correlate with impact/toughness test data |
Based on research, you can implement variothermal cycles (e.g., cavity preheat to 120–160°C then rapid cooling) or local heating near weldlines to boost fusion; trade-offs include 10–40% longer cycle time but often a 15–30% improvement in weldline toughness for thin-wall parts. Combine with conformal cooling to regain cycle time while maintaining higher surface temperatures during fill, and verify gains with tensile and Izod testing.
Advanced Temperature Tactics
| Tactic | Benefit & Consideration |
| Variothermal molding | Improves surface fusion and weld strength; increases cycle time unless paired with rapid cooling |
| Conformal cooling | Reduces hot spots and cycle time, preserves uniform toughness |
| Local heating (inserts/heaters) | Targets weldlines without heating entire mold; faster than full variothermal |
| Data-driven tuning | Use sensor feedback to iterate Tmelt/mold setpoints and validate with mechanical tests |
Balancing Stiffners and Impact Modifiers for Structural Integrity
Optimizing rib geometry and additive loadings lets you push stiffness without brittle failures: design ribs at 0.4–0.6× nominal wall thickness and use fillets ≥0.5 mm to avoid stress concentrators; pair 10–30% glass-fiber reinforcement for a substantial modulus boost with 3–10% impact modifier to restore toughness. Run short-shot trials and drop-weight or Izod tests to validate the stiffness–toughness tradeoffs for your part.
- The Role of Reinforcements in Thin Wall Applications
Glass fiber, mineral fillers, or short carbon fibers raise flexural and tensile modulus while altering flow and fiber orientation—important in thin walls where high shear aligns fibers along flow, increasing directional stiffness. Glass fiber reinforced thermoplastics (QFRTP), glass fiber mat reinforced thermoplastics (GMT), sheet molding compounds (SMC), resin transfer molding materials (RTM), and hand-laid FRP products are currently among the glass fiber reinforced composite materials used in automobiles. Typical automotive parts use 20–30% glass fiber to hit target modulus and dimensional stability; adjust gate locations and injection speed to control anisotropy and preserve impact performance.
- Impact Modifiers: Enhancing Toughness without Compromising Strength
Core–shell rubber particles, acrylic impact modifiers, and thermoplastic elastomers boost notched-impact by 50–200% at 3–12% loadings while keeping flex modulus losses under ~10% when selected and compounded correctly. You can choose modifiers based on particle size and matrix compatibility to minimize haze, maintain tensile strength, and avoid excessive melt viscosity increases that harm thin-wall filling.
Delve into modifier selection by targeting particle sizes around 100–500 nm for core–shell systems to maximize energy dissipation without sacrificing stiffness; use twin-screw compounding or masterbatch dilution to ensure uniform dispersion. Run ASTM D256 notched Izod, tensile, and mold-filling trials in 2–5% increments to balance haze, weld-line strength, and shrinkage, and consider compatibilizers for high-filler or glass-filled systems to stabilize interface adhesion.
Precision in Packing and Holding Phases to Eliminate Defects
Dialing packing pressure to 50–80% of peak injection pressure and holding until the gate freezes prevents volumetric shrinkage in thin-wall parts. You time hold periods to gate-freeze events rather than fixed timers; thin gates commonly freeze in 0.5–5 seconds depending on geometry. Use cavity-pressure traces to set switch-over and decay profiles, and limit hold-stage flow to avoid backflow. Optimized packing improves dimensional stability, reduces sink marks, and preserves part modulus without adding brittleness.
- Techniques to Minimize Sink Marks and Warping
Apply multi-stage, decaying packing profiles: start with a high initial pack to fill thin features, then step down 10–30% across stages to prevent overpacking bosses. You can deploy sequential valve gates for localized packing and design ribs at about 0.6× nominal wall thickness to add stiffness without inducing sinks. Implement conformal cooling or balanced channel layouts to reduce thermal gradients; many molders see 15–30% reductions in warpage and cycle time with optimized cooling.
- The Importance of Proper Cooling and Holding Pressure
Cooling often takes 40–70% of cycle time for thermoplastics, so you must minimize temperature differentials that cause differential shrinkage. Apply holding pressure until gate solidification—detectable with cavity pressure or short-shot trials—then ramp off to relieve residual stress. Target uniform mold surface temperatures within ±2 °C for thin-wall components to limit distortion and maintain stiffness.
You can tighten control by installing cavity-pressure sensors and automating switch-over at the pressure peak; this yields repeatable part weight and sharper sink/warp control. A practical three-stage packing recipe is: initial fill-pack at 70–80% peak pressure, a mid-stage decay to 40–60% to compensate bulk shrink, and a low final hold until gate freeze. Run a DOE varying hold pressure ±10% and hold time ±20% while measuring shrinkage on a CMM to pinpoint settings that typically bring weight variation under 0.2% and visibly reduce sink marks.
Material Choices: Tool Steel and Wear Resistance with Additives
Balance steel grade, surface treatment, and expected abrasive load to protect cavities in thin-wall runs; P20 (28–32 HRC) suits low-abrasion resins, while H13/H11 (42–52 HRC) or nitrided variants handle higher temperatures and glass-filled compounds. Chrome plating (10–25 µm) or plasma nitriding (0.2–0.5 mm case) extends life, and you should match treatments to expected filler levels and cycle counts rather than defaulting to cheapest options.
- Selecting the Right Steel for Enhanced Durability
P20 remains the industry workhorse for general-purpose molds, but you choose H13 for repeated high-temperature cycles and abrasive resins; H13 delivers higher toughness and hardness after heat treat (typically 42–50 HRC). For high-gloss thin-wall parts or corrosive environments, NAK80 or stainless options give better polishability and corrosion resistance, while nitride-treated steels push surface hardness above 58–60 HRC for abrasive-filled runs.
- The Impact of Mineral Additives on Tool Life and Product Quality
Talc, CaCO3, wollastonite and glass fiber change wear and flow: talc/CaCO3 used at 5–20% and 10–30% respectively reduce shrinkage but increase abrasive loading, while glass fiber at 10–30% sharply raises cavity abrasion and fiber pull that ruins surface finish. You’ll see higher back pressure, shorter melt flow, and more frequent polishing; plan venting and gating for filled systems to preserve cavity detail and dimensional control.
Mitigation strategies you can apply include targeted surface hardening, hard chrome or PVD coatings (10–50 µm), and fine polishing to Ra <0.2 µm to limit fiber biting; shops commonly report nitriding plus chrome extending tool life from a few hundred thousand to into the low millions of shots on abrasive compounds. Schedule inspections every 50,000–200,000 shots based on filler level, and log wear patterns so you can replace inserts before parts quality degrades.
Navigating Defects: A Comprehensive Map for Quality Control
Overlay SPC and FMEA with cavity-pressure monitoring and cycle-to-cycle data capture; aim for Cpk >1.33 and overall defect rates under 1%. Use high-frequency sensors, shot-weight traceability, and automated rejection to catch drift within 2–3 cycles. Establish baselines across tool cavities (10–20 sample lots) and lock tooling/machine windows before changing material or geometry.
- Identifying and Addressing Common Defects: Splay, Flow Lines, Knit Lines
Splay in your parts often indicates moisture or excessive shear—dry hygroscopic resins to <0.02% (ABS typically 2–4 hr at 80°C) and reduce screw speed/back pressure. Flow lines stem from slow fill or low melt temperature; increase injection speed, tweak gate geometry, or raise melt 10–20°C. Knit lines occur where flow fronts meet; add holding pressure, shift gate location, or raise mold temperature 10–20°C to promote fusion and eliminate cold joints.
- Quality Assurance Methods to Balance Flexural and Impact Strength
Target Cpk >1.33 on both measures by running ASTM D790 (flexural) and ASTM D256 (Izod) under SPC with sample sizes of 25–30. To swiftly map trade-offs, use a 3-factor DOE (melt temperature, injection speed, and packing pressure) with Taguchi L9. Then, confirm material adjustments (10–20% impact modifiers or controlled annealing) to recover 20–40% of lost impact while maintaining modulus.
Real-time control is made possible by correlating cavity-pressure signatures (peak and integral) to final stiffness; several shops claim R2 > 0.8 for flexural modulus predictions. To identify upstream reasons, incorporate in-line NIR moisture checks and thermal imaging. For continuous process improvement, set alert thresholds based on a 100-run baseline, implement remedial measures within two cycles, and record changes in your SPC system.
Conclusion
As a reminder, when pursuing thin-wall injection molding to increase modulus without inducing brittle failures, you must optimize material selection (high-modulus polymers with toughness modifiers), refine your part and mold design for uniform wall thickness and controlled flow, and tightly control processing—temperature, pressure, cooling rates and shear—to avoid orientation-induced embrittlement. Use fillers, compatibilizers and post-mold stress-relief or annealing, validate with simulation and testing, and iterate to balance stiffness, ductility, and manufacturability for reliable parts.